How to start a food blog: A quick step-by-step guide to starting your food blog! From one foodie to another.
The advantages of having a blog
Anh, who even reads blogs anymore?
Like many content creators, my initial thoughts about blogs are in line with the above sentence.
Everyone says social media is how you make it nowadays, but what happens if Instagram/TikTok goes bankrupt or disappears? What if you get hacked and cannot get back your account? Will all your followers be gone as well?
Unlike social media, having a blog is something you OWN that is not going away. By having a blog, you also have a portfolio of easily searchable, SEO-friendly content that you can showcase to brands for partnerships. Blogs also allow you to create and grow an email list, so you can send personalized emails and exclusive updates to.
Currently, my revenue generated from website ads is my most stable form of income. With blog posts, you can generate passive income and optimise old blog posts to gain more traffic, whereas social media posts get instant traction but die down after 2-3 weeks.
To summarize, the advantages of having a blog are:
- Evergreen content that can be easily searchable
- More sustainable in the long-term
- Grow an email list
- Allows for stable, passive income
How to create a food blog?
To make it easier for you, I have compiled a list of 6 easy steps to get your food blog running and start building that traffic while sharing your passion with the world.
- Find your niche
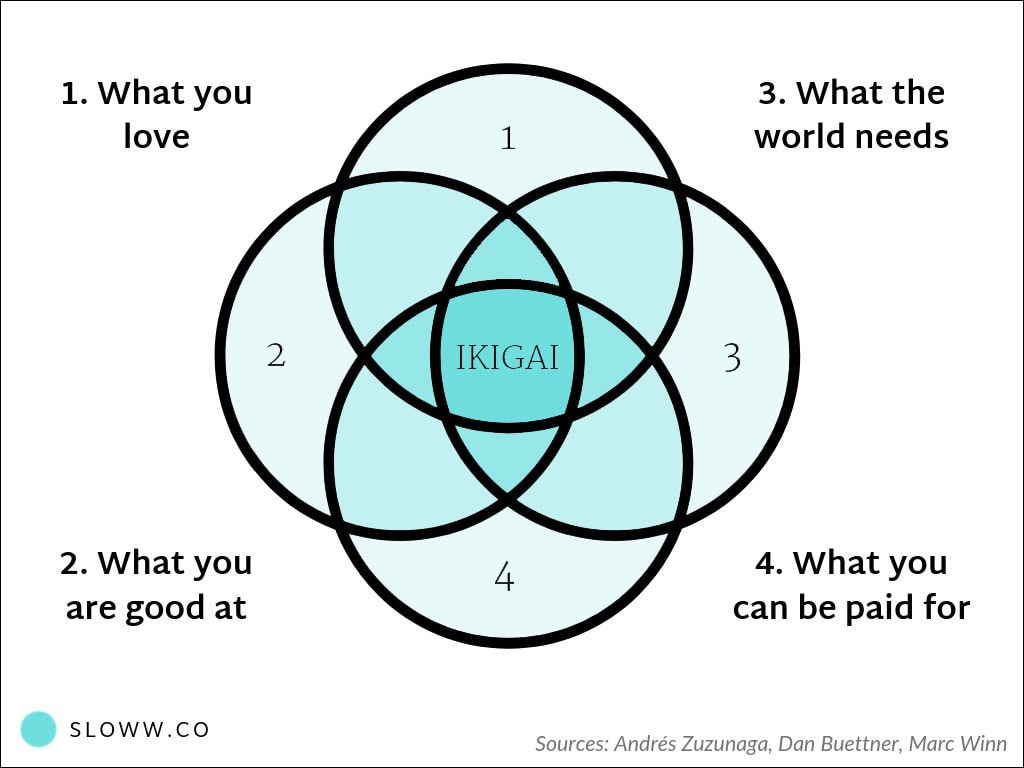
The hardest thing about blogging for many is choosing a topic to start with. Having a niche will assist you in finding your audiences and give you a clear direction in creating content. To decide on this topic, I’d like to ask myself a few questions:
- What are your passions and interests?
- What are you good at? What makes you unique from everyone else? What do people around you normally compliment you on?
- What is needed more in the world?
- What you can be paid for?
Ultimately, the intersection between all of the above questions will help you decide your passion and the topic of your blog. That is your Ikigai - your reason for being! To start with, you can find an intersection between two or three of the four circles then connect the rest as you go on your journey.
In my case: When I started VeggieAnh, I know that I LOVE cooking and taking pictures of food. I did not realize that it was a strength of mine until I have many friends and family members compliment my cooking skills and food. Additionally, I have always loved creating video content, and I have a life-long passion for making videos. So I decided to make food recipes for my blogs and videos on my Instagram.
Back when I first started food blogging, I adopted a plant-based diet and realized a need for more plant-based recipes and debunking the misconceptions about plant-based food. So that’s how my niche was created and how VeggieAnh came about: my passion and strength in cooking and making videos and the need in the world for more plant-based recipes.
2. Name your blog + Buy a Domain name
The second step here: Naming your blog. I struggled with this a lot too, but in the end, I decided to go with something that is memorable and represents my purpose: VeggieAnh (I am Anh who inspires you to eat more veggies).
To come up with a name, I recommend you to:
- Make a list of names then narrow it down
- Keep it short, simple, catchy and somewhat related to your niche. Don’t overthink it!
- Do research to make sure the domain name hasn’t been taken
I bought my domain name via one.com which was recommended to me by my former colleague. It has really good support, security and they have a good deal for first-year users (use my referral link for €14 off).
3. Choose your website host and install WordPress
What is a web host? Well, a web host is basically where your blog is going to live. It isn’t going to live on your computer, it is going to (eventually) take up a lot of room. So it will live on your web host’s server.
I chose one.com and when I purchase my hosting plan, I got the free domain name via it.
Once you have your domain and your web-host all set up, you need to install WordPress. What is WordPress: WordPress is the framework through which you will actually create your blog and customize your website. It is kind of the behind-the-scenes framework.
4. Choose a WordPress theme and customize your website appearance
Almost there! Choose a WordPress theme that you like to make your website look beautiful! VeggieAnh uses a free theme on WordPress called Yummy Recipes. This theme is quite easily customizable!
Other (paid) options I see some other food bloggers use are: Foodie Pro or Cook’d!
5. Start writing blog posts
Once you have created the food blog, it's time to start writing your blog posts and building that traffic.
Not sure how to write a blog post?
Download my FREE Blog Checklist below. I personally use the checklist for every blog post to make sure it's helpful to my audiences and optimized for SEO. It's a major time saver! I have also included 10 ways I use to look for content ideas.
Have any additional questions about starting your food blog? Feel frustrated with your website and need more guidance?
Message me on IG on my coaching account or book a consulting call with me here!


Thakzhan
Really great post! I have never heard of one.com before. Sounds really affordable! I am currently using ghost.org, but I think for my next website, I will use one.com (and will access it through your referral link) ^^
Veggie Anh
Thank you for your comment! Good luck with your new website 😀